
Rewild Your World
Week 6 - Know Your Habitat
.png)
Intro – A Week of Planning That Changes Everything
Begin the week by revisiting what students learned about habitats, habitat scores, biodiversity, and their Champion Animals. Discuss the strengths and weaknesses identified, and remind students that these observations and findings will inform real design choices. This week moves from analysing evidence to applying it to make real design decisions for their school.
As lessons progress, guide students to link new learning with prior learning and their earlier surveys. Point out when they use their vocabulary, mapping skills, or research knowledge to justify and strengthen their choices. Reinforce that effective habitat planning blends creativity with scientific thinking and practical judgement. Encourage students to consider space, safety, accessibility,
maintenance, feasibility, and the needs of multiple Champion Animal species and existing species living in the school grounds, rather than designing for a single animal in isolation.
This week marks a significant step in your "Rewild Your World" journey. You have already analysed your school habitat, calculated a score based on evidence, and researched the specific needs of your Champion Animal. Now, you will use all of that knowledge to begin planning a realistic habitat design that could be developed within your school grounds.
You will learn new keywords that help you think like an ecologist, read a real rewilding story that shows how damaged places can recover, and share your Champion Animal presentation so everyone understands its needs. Using your survey data and research, you will then create your own "Wild List" that identifies the essential features required for your species to thrive; as a class, you will combine the shared lists, highlighting common needs.
Next, you will work in a small group to design the perfect school habitat. You will use your maps, symbols, and science skills to create a space that is balanced, feasible, supported by the evidence, and beneficial for all Champion Animals. At the end of the week, your class will evaluate the proposals, and you will take part in a fair vote to choose the design your class will follow.
Finally, you will select a team to join. Each team has an important role in researching plants, materials, tools, and support so your habitat design can become a real-world project.
This week matters because your role as an observer and researcher now moves to you being a designer. You are no longer just learning about habitats you are helping to plan and design one using evidence, collaboration, and critical thinking.
Your Weekly Keywords
Begin by briefly revisiting the habitat survey and scoring completed in Lesson Sequence 5. Remind students that this vocabulary will now support design decisions.
Model how to connect a keyword to a real example from the survey. For example, demonstrate how a term such as "drainage" or "clay" relates directly to features students observed and tested on their school grounds.
Encourage students to:
Justify their definition matches
Refer back to survey evidence
Use precise language when explaining their thinking
Support students as they explore this week’s vocabulary by modelling how to make connections between new terms to the practical work they will complete as habitat designers. Encourage students to connect their earlier survey findings with words that describe structure, planning, improvement, and the features that help a space support wildlife.
This week, you will explore a new set of keywords that will help you understand how to plan and design a habitat that supports many different animals.
You are working to understand what each word means in simple, clear terms.
These words will become tools that help you think, plan, and make better decisions as you design your habitat.
Each keyword is connected to an important idea about how habitats work and what animals need to survive. Some of the words may be new to you, and that is part of the journey. Take your time to explore them and build your understanding.
Your task is to read each word and its definition, then make sense of it in your own way. You might choose to rewrite the meaning in your own words, draw it, or explain it to a partner. You can use books, digital tools, or class resources to support your thinking.
As you work, talk with others about what you notice. Which words help you understand what animals need? Which ones help you think about how to design a healthy habitat? Which ideas connect to what you explored in your survey last week?
By the end of this task, you will have a stronger understanding of the language we use and how it helps you create a wild space that supports many different animals in your school environment.

Quote of the Week - Sylvia Earle
Use this activity to help children recognise their individuality before they explore rewilding. Guide gentle conversations about what makes each child unique and how the things they care about can help them make responsible choices.
Look for self-awareness, confidence when sharing personal information, and respect for the interests of others. Encourage children to notice similarities and celebrate differences.
This creates a calm and inclusive foundation for understanding that everyone has things they value and things they want to take care of.
“Knowing is the key to caring, and with caring there is hope that people will be motivated to take positive actions.” – Sylvia Earle
This week’s quote reminds us that when we learn something new about nature, we begin to care about it more deeply. Every plant, animal, and habitat becomes more precious when we understand how it works and why it matters.
Consider who Sylvia Earle is, the work she has done in marine conservation, and why she believes knowledge leads to protection.
As a class, take time to talk about what Sylvia Earle meant when she shared this idea.
After your discussion, use the template to write your own powerful quote about protecting habitats. Think about what you believe, what you want others to notice, and how your words could inspire people to care for wild places. Make your message clear, thoughtful, and full of hope for the future.

Rewilding the World – Story of the Week – Wetlands for Wildlife
Begin by revisiting the idea of rewilding and how people can help heal damaged places by bringing natural habitats back to life. Remind students that in Lesson Sequence 5 they identified habitat strengths and weaknesses within their school grounds.
Introduce the Hanlon Park story, highlighting how removing the concrete drain, reshaping the land, and planting native plants allowed the wetland to return and support many different species again.
Encourage students to discuss how the new wetland created shelter, food, and safe spaces for frogs, insects, birds, turtles, and other animals. Guide them to notice the importance of community teamwork, including how volunteers, council members, and scientists worked together to solve problems and design a healthier space for wildlife.
Highlight key concepts:
Water flow and erosion
Native vegetation
Ecosystem services
Complexity of the space
Human interactions with the environment
This week, read the story on the task card about how a plain stormwater concrete drain in Brisbane was turned back into a real wetland ecosystem. You will learn how the waterway used to be hard, empty, and lifeless, and how the community worked together to remove the concrete, plant new native vegetation and grasses, and re-shape the land so animals could return.
As you read, look for the many ways the wetland changed once nature was given space again. Notice which animals came back first, how the water slowed down, and how frogs, turtles, insects, birds, and even people began to enjoy the area again. Then think about what this story can teach you about helping your own Champion Animal.
Use this example to guide your choices as you start planning your own class habitat. Even small actions can help wildlife return when people care, try their best, and work together.


Comprehension – Creating Habitats
This comprehension task helps students understand different habitat features and grow as readers through literal, inferential, and applied questions. Remind them that literal questions ask for facts from the text, inferential questions help them read between the lines, and applied questions ask them to link ideas to real habitat design and local environments.
Guide students to use evidence from the text when sharing their thinking. Encourage them to notice how different habitat features work together and why plants, water, shelter, soil, and microhabitats all matter for keeping an ecosystem healthy. Help them spot simple patterns such as how flowers attract pollinators, how messy areas support insects, or how water sources help many species survive.
Prompt students to connect the information to their Champion Animal and to the class habitat they are planning this week. Support them as they explore cause and effect, such as how more plant variety brings more wildlife. Give feedback that values curiosity, clear reasoning, and meaningful links to real environmental challenges.
This week, you will read an information text about how different habitat features help living things survive. You will explore plants, water, shelter, microhabitats, and the many structures that make a place safe and healthy for wildlife. Each feature gives animals food, protection, space, and support in its own way.
As you read, look closely at how these features work together. Notice how flowers, grasses, bark, leaves, water, and shade all create different conditions for different species. Think about how animals use these spaces for nesting, hiding, feeding, protection, breeding, or connectivity, and how a mix of features helps more animals live in one area.
This text will support you to plan your own class habitat this week. It will show how living things rely on plant diversity, messy areas, water sources, and safe shelters, and how a habitat must meet many needs to stay balanced. Read each question carefully, as the comprehension will move from simple recall to deeper thinking.
As you work, record key information and take notes on important examples that show what habitat features provide and why it matters. Think about how these ideas link to your Champion Animal and how your own habitat design will need to include similar structures. If you would like to create your own examples, use the template to build a list and explore how each feature helps a whole ecosystem stay alive.


Record Your Answers – How Far Can You Go
Explain to students that this week’s comprehension task steps them through four levels that become gradually more demanding. The goal is for them to move from simple understanding toward explaining ideas and applying what they know to real habitats. Encourage them to take their time with each level and to answer in full sentences that clearly link back to the information about forest layers and habitat components.
Show students how good readers pause to check a paragraph, look for clues, or reread a sentence when something feels tricky. This helps them see that deep thinking is a normal part of learning. Give them quiet space to focus so they can concentrate on the structure and meaning of the text.
Invite students to highlight new scientific words, jot notes beside the text, and underline ideas that connect to their own habitat designs. When everyone has finished, ask them to record the level they reached and choose one skill they want to strengthen next time.
After reading the information about forest layers and the different parts that make up a healthy habitat, you will answer twelve comprehension questions that become more challenging as you move through the levels. You will begin with Level 1 questions that ask for simple facts, and then move toward Level 4 questions that invite you to think deeply, make connections, and apply your understanding to real environments.
Write your answers in full sentences and use evidence from the text to support your ideas. Take your time and read each question carefully before responding.
If you find a question challenging, pause and think. That moment shows your understanding is growing and that you are ready to explore new ideas about how forest layers work together, how habitats support living things, and how these systems shape the world around us.


Sharing Your Champion Animal Presentation
Let students know that their presentation is a chance to share their unique voice and teach their classmates something new about their Champion Animal. To support them, you will provide a simple rubric, with essential content listed such as food, water, shelter, breeding, and connectivity. Provide a set of public speaking (presentation) guidelines to support students in communicating with clarity and confidence. These may include maintaining eye contact, speaking at an appropriate pace, volume, and expression. Remind students what they should include in their speech, such as food needs, water sources, shelter, breeding requirements, and safe ways their animal moves through its habitat.
Make it clear that this rubric is not for marks or scores. It is simply a guide to help students stay focused and feel confident as they speak. Model what a concise, evidence-based explanation sounds like. Demonstrate how to move beyond listing facts to explaining why each habitat feature matters.
Encourage students to see the guidelines as a helpful starting point, not a limit. Remind them that creativity is celebrated here. They can use drawings, questions, stories, actions, or props to help their audience understand and stay engaged. Every presentation should look and feel different because every child has researched different facts and built their own understanding.
As students present, support them in using their individuality to bring their animal to life. Celebrate moments where they use the knowledge they gathered over the last few weeks to include others, spark curiosity, and explain ideas clearly. Encourage their classmates to listen deeply, ask thoughtful questions, and learn from every speaker.
This week, you will present the resource you created last week to the rest of your class. Your presentation should last between two and five minutes and aim to be interactive, clear, and accurate so your audience stays interested and involved. Your goal is to teach your classmates what you have learned about your Champion Animal and help them understand why it needs a healthy habitat to survive.
During your presentation, make sure you clearly explain your animal’s needs. Support your explanation with evidence from your research. You may include visuals, diagrams, short questions, or interactive elements to maintain engagement. The task card opposite will guide you on the topics you should cover, such as the food it eats, where it finds water, the type of shelter it relies on, how it breeds, and the safe pathways it uses to move around its environment. These details will help your classmates see how every species depends on its habitat in different ways.
Try to include exciting facts or discoveries from your research. You might share something unusual about your animal’s behaviour, a clever adaptation, or a problem it faces in the wild. These details help inspire others and make your presentation memorable.
Your success criteria are simple. By the end of your presentation, your classmates should have learned something new about your animal that they did not know before, and they should be able to explain at least one key habitat requirement of your animal and why it matters. Speak clearly, show confidence, and enjoy the chance to teach others about the species you have become an expert in.
During other people’s presentations, make sure that you are making a note of all the champion animals that have been presented, as you will need this information later.
You must be familiar with all the animals supported by your class. You can use the space at the bottom of the task card to draw each Champion Animal and make a note of its name.


Completing Your Wild List
Guide students as they complete their Wild Lists by reminding them that this task is all about careful planning for the future.
Prompt students to refer back to:
Their LS5 habitat score
Identified gaps
Research notes
Encourage them to draw on everything they already know about their Champion Animal, including the results of last week’s habitat survey. Their choices should be thoughtful and based on real needs, not guesses.
Invite students to collaborate with classmates who selected the same animal. Working together will help them check facts, compare ideas, and build a clearer understanding of what their species must have in order to survive. This also strengthens their ability to justify decisions and explain why certain features are essential.
If students come across items on the Wild List they do not recognise, model how to use the Wild Projects Booklet to find reliable information. This helps them become confident, independent learners who know how to seek out answers.
Using the task card opposite, you will now create a Wild List for your Champion Animal. You can work independently or with classmates who chose the same animal. Talk together about all the different features your animal needs to survive in the wild. Think about things like native food plants offering flowers, fruit, leaves, or seeds, shade trees, roosting and nesting sites, nest boxes, leaf litter, insect hotels, water spots, connectivity pathways, and safe hiding and breeding places.
Your job is to look closely at the Wild List and review, then tick off every item your Champion Animal needs to thrive in your local environment. If you are unsure about any items, such as insect hotels, frog hotels, or other features, you can look them up in the Wild Projects Booklet. It will help you understand what these things are and how they support wildlife. You may later select one of these to make, or create your own project to install in the school for your champion animal.
This list is only for your animal right now. Later on, we will bring everyone’s lists together to see what the whole class needs. This will help us spot any crossover and start designing a habitat that supports all Champion Animals in our school.


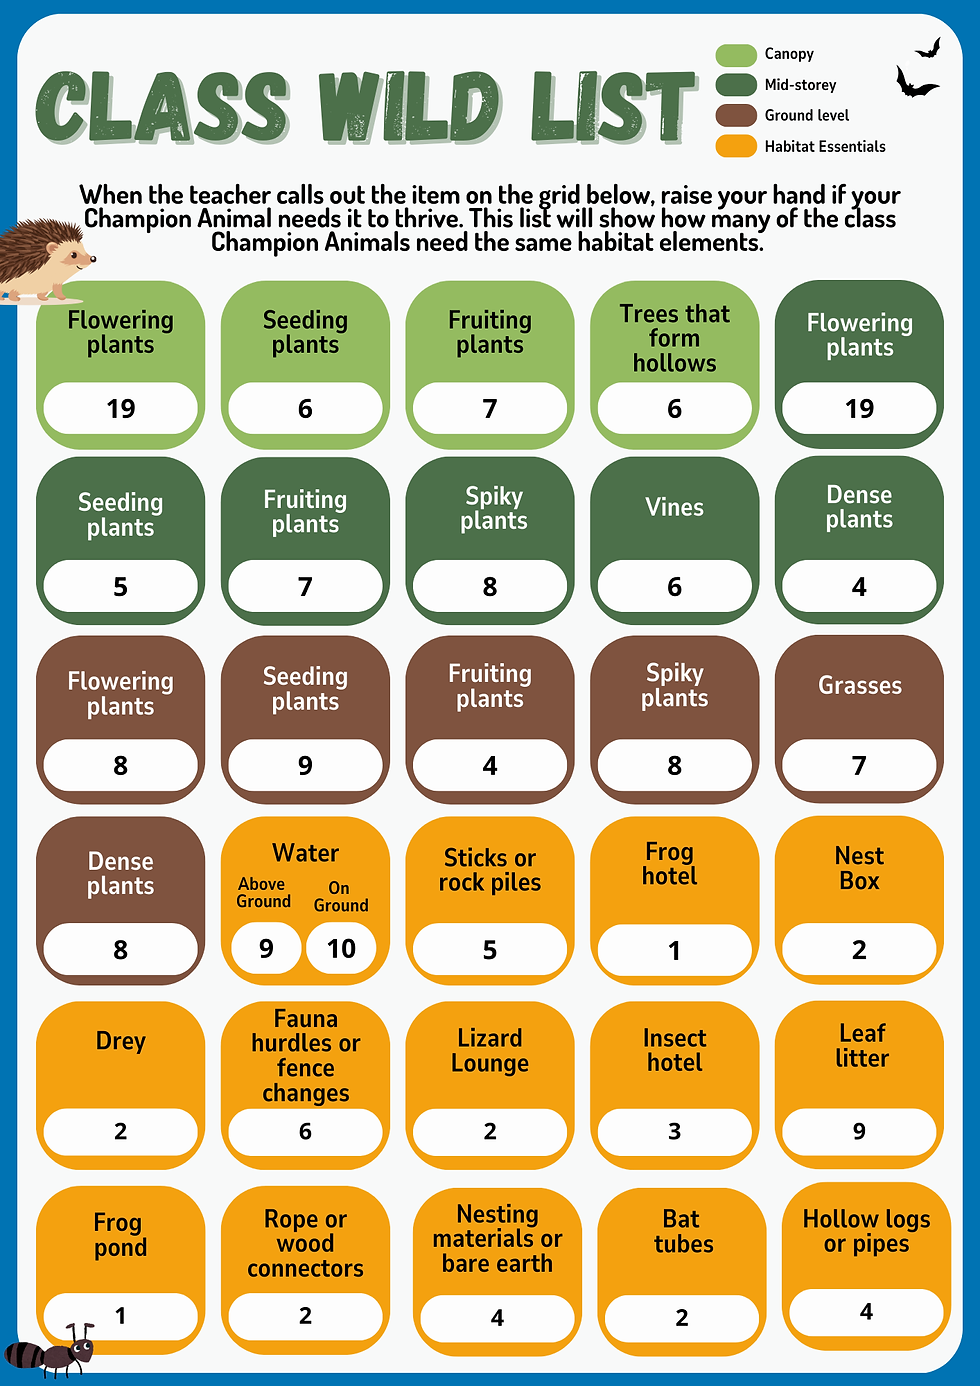
The Class Wild List – Pulling it All Together
Display the master Class Wild List at the front of the classroom so every student can see it clearly. Provide each child with their own copy, too. As you call out each item, invite students to raise their hands if their Champion Animal needs it, and encourage them to tick it off on their personal list at the same time. You can select a separate coloured tick to separate the needs of their own Champion Animal from the added needs of the other species. This keeps everyone actively involved and builds a shared sense of purpose.
This process helps students recognise which habitat features are commonly needed across many animals and which ones are more specialised. As hands go up, the class will naturally begin to see the crossovers between species, noticing patterns such as how many animals rely on fruiting trees, flowering plants, shade, leaf litter, water access, or safe nesting sites.
Highlight that almost every item on the Wild List will need to be sourced in order to build a strong, healthy, and inclusive habitat. Emphasise that this is real planning; their choices now will shape the habitat design they create later in the week.
Encourage calm discussion as students notice similarities between species, ask questions, or compare needs. Celebrate moments when students make thoughtful connections, such as realising that one feature can support several animals at once. This activity sets the foundation for collaborative problem-solving as the class begins to plan the ultimate habitat together.
Now it is time to combine everyone’s Wild Lists to identify the shared habitat needs across all Champion Animals.
In this activity, your teacher will stand at the front of the room to read out each of the items from the Wild List now presented on the Class Wild List. As she reads each item, raise your hand straight away so your teacher can tally the numbers, which will be added to the Class Wild List. If your animal is being championed by multiple people, you need only count it once. This will serve to record how many Champion Animals need each item.
This helps us see which habitat features most animals in our class need. Some items might only be needed by one animal, while others might be important for almost all species. By collecting this information, we can work out what must be included in our final class habitat design.
Later in the week, you will use the completed class Wild List to help create a shopping list of all the plants, materials, and resources needed to build a habitat where every Champion Animal can thrive.
Make sure you are listening carefully, have your own Wild List ready, and raise your hand whenever you hear something your animal needs. Your information helps our whole class plan a habitat that supports every creature.
Design Your School Habitat
Encourage students to see this task as both a creative design challenge and a real planning exercise. Remind them that the habitat they create may actually be built, so their decisions must be thoughtful, realistic, and based on what their Champion Animals genuinely need.
Guide groups to collaborate respectfully, sharing ideas, listening to one another, and making decisions together. Highlight that good designers work as a team and explain their choices clearly.
Support students as they organise their maps, symbols, and Wild Lists. Model how to plan step by step so the task feels calm and manageable.
Prompt critical thinking by asking helpful questions such as:
Will this feature truly help the animal?
Do we have too many plants here, or not enough?
Is this design realistic for our school grounds?
Can people still move safely through the area?
Is this habitat sustainable in terms of budget? (Note: funding for the project is addressed in the Teamwork lesson, but be mindful of budget constraints as you guide students in planning).
How can we create a space to benefit both students and wildlife?
Could we plant and maintain this in real life?
Is this something we could actually build with the materials we have?
How is the design helping with connectivity at both ground level and canopy level?
Using a fresh copy of your bird’s eye view map, you will now design a realistic habitat that could be built in your school grounds. It is now time to design a habitat for the range of animals being championed by your school.
Work in a small group of two to four students. You can choose your friends or join others who have the same Champion Animal as you, or form a mixed-species design team.
Use the habitat symbols on the task card opposite to indicate different sorts of plants and other habitat essentials. You can draw these onto your bird’s eye map or take a photo of your map and add it to our template, then copy and paste the icons as needed. Place them onto your map to show where different features should go. Think carefully about the needs of every Champion Animal in your class. Remember to check the Class Wild List your teacher has displayed on the board. This list shows which features are most important and which parts of the school might need improving.
As you design, think like real planners and problem solvers. Ask yourself:
Is this realistic or am I adding too much?
Is this design achievable within our space and budget?
Does it prioritise the most common habitat needs?
Have we balanced ground, shrub, and canopy layers?
Will people still be able to walk safely through the school?
Could I include an outdoor classroom within the garden?
Is this financially possible for our class to build?
Does every animal have what it needs in this space?
Try not to overcrowd the environment. A habitat should help animals, but it must also work for the school community. This activity is not only about creativity. It is also about thinking carefully, solving problems, and making smart choices.
When your map is finished, your design will be displayed in the classroom. Later this week, the whole class will take a democratic vote to choose one habitat design that the school will create. Remember, this is not a competition. Your goal is to design a realistic, achievable, and animal-friendly habitat that improves your school for both humans and wildlife.
You can look at the example on the task card opposite for inspiration.


Hold Your Vote – Which Habitat Works Best?
Guide students through the voting process by modelling how to make decisions based on evidence rather than personal preference.
As a class, you may agree on some voting criteria such as:
How the habitat provides for biodiversity
How it works for students
How it connects to habitats beyond the school
How achievable it is
Remind them that the goal is to choose the design that best meets the needs of all Champion Animals, not the design made by their friends or the one with the brightest colours. It is a criteria-based decision. Encourage them to look for clear features such as food sources, water access, safe shelter, breeding spaces, and strong connectivity.
Help students think realistically about what can actually be built in their school grounds. Prompt them to consider space, safety, supervision, plant care, long-term maintenance, and whether the design can be achieved with the time, tools, and budget the class is likely to have.
Ask reflective questions such as, "Which design seems practical?" and "Why might this layout work better than another?" These prompts help students practise logical thinking and real-world planning.
Reinforce that democratic voting is about fairness and collaboration. Celebrate the way students respect each other’s ideas and listen carefully before choosing. Encourage calm discussion and remind students that all designs have strengths, even if only one can be selected.
Support students in seeing that this is the start of a larger project. Emphasise that choosing a realistic and achievable design now will help the class work efficiently later when planting, building, and gathering resources. Praise thoughtful decision-making, mature reasoning, and the ability to stay focused on the shared goal of creating a healthy, functioning habitat for all Champion Animals.
Now that every group has designed their ideal school habitat plan, it is time to choose the one that will become our real blueprint. All of the designs will be displayed around the room so you can walk around, look closely, and carefully think as you evaluate each plan against the same criteria.
Your job is to vote for the design that you believe will support all of the Champion Animals, can actually be built at school, and is sensible in terms of the work and the money needed. Think about things like space, safety, plant choices, and whether the design feels realistic and is safe and practical for the school community and achievable within likely time, budget, and maintenance limits.
Remember, you cannot vote for your own design. This helps keep the vote fair and democratic. When your teacher calls each design, simply raise your hand for the one you choose. Alternatively, you could hold an anonymous vote. The design with the most votes will become our class habitat plan, and we will use it as the guide when we begin building and planting.
This is not about winning or losing. Every idea matters, and every group has shown brilliant thinking and creativity. This vote is simply about choosing the plan that will help nature the most and bring our whole class together in the rewilding project.

Choose Your Mission – Teamwork is Dreamwork
Support students as they make their team choices by reminding them that each group plays a vital role in bringing the habitat project to life. Encourage them to think carefully about their strengths, interests, and the skills they have developed throughout the course. This is an opportunity for students to make a meaningful contribution and consider leadership opportunities, so guide them away from choosing teams based only on friendship groups.
Invite students to walk around the room and read each task card before deciding. Highlight that the teams are interconnected and will all need to work together throughout the week. Emphasise that no single team is more important than another and that the success of the final habitat depends on everyone doing their part.
Model how to reflect on personal strengths. For example, students who enjoy organising might be suited to the Tools and Equipment Team, while those who feel confident speaking with adults may be a great fit for the Community Support Team. Children who are creative or love gardening might naturally gravitate towards the Plant Team or Wood and Habitat Team. Strength in problem-solving could make the Green Light Team or Financial Support Team a good match.
This week, you will choose one of our six special teams to join. Each team has an important job that will help us build the perfect school habitat. Walk around the room, read the task cards, and think carefully about which team matches your strengths.
The teams are:
Plant Team
Community Support Team
Wood and Habitat Team
Tools and Equipment Team
Green Light Team
Financial Support Team
Take your time exploring each one. Ask yourself what you enjoy, what you are good at, and where you think you could be most helpful. Try not to choose a team just because your friends are there. Choose the team where you can make the biggest impact.
Once you have chosen your team, sit together and start planning. Talk about what needs to be done, what items you might need, and how you will share the jobs over the next week. Each team will play a vital part in gathering resources, organising people, and helping us get ready to build our habitat.
Your choice matters. Your teamwork matters. Together, you can help create something amazing for your school and your Champion Animals.


Weekly Mindfulness – Plant Features
This mindfulness activity invites students to slow down and notice the tiny details that help plants grow, survive, and thrive. Encourage them to step outside quietly, breathe calmly, and let their senses guide their observations. Remind them that plant features are often small and easy to miss, so patience and careful looking are essential.
Guide students to focus on subtle details such as leaf veins, patterns in bark, textures on stems, tiny hairs on leaves, seed shapes, and the colours found in flowers or new growth. Prompt gentle questions such as, "What might this pattern help the plant do?" or "Why is this texture useful?" These simple prompts help students build awareness of how plants are adapted to their environment.
Model this calm and attentive behaviour by joining the activity yourself. Sketch alongside the students and write a short rhyme or reflective line to show that mindfulness and creativity are for everyone. This helps create a peaceful, focused atmosphere outdoors.
This week, you will spend quiet time outdoors paying close attention to the tiny details of the plants around your school. Plants might look simple at first, but when you slow down and really look, you will find patterns, colours, shapes, and textures that you may have never noticed before. Walk slowly through your school grounds or garden and look carefully at leaves, stems, bark, roots, and flowers. Some details are so small that you may like to crouch down or look twice to really see them. A magnifying glass can help if you have one.
Bring your sketchbook or task card and choose one or two plant features to observe closely. Use your pencil to draw exactly what you see and focus on the tiny details that make each plant unique. Look at the veins on leaves, the lines in the bark, the textures on stems, the patterns on petals, or the shapes of seeds and seed pods.
After drawing, try writing a short rhyme or simple poetic line about your discovery. You might create something like:
Lines on a leaf, so tidy and neat,Helping the plant stay strong in the heat.
Let your rhyme show the beauty and uniqueness you noticed in your plant. Take this time to slow down, breathe calmly, and enjoy seeing nature with fresh eyes. This is your chance to pause, observe, and appreciate the hidden details that help every plant grow and survive.


Your Digital Résumé – Experience 6
Encourage students to treat their digital résumé as a place to capture real insights from this week’s planning work. Invite them to think about what it was like to compare Wild Lists, examine everyone’s habitat needs, and design a shared space that could support many species at once. Help them notice how this process strengthened their decision-making, creativity, and ability to work with others.
Guide students as they use digital tools to shape their reflection page. Model how to choose a layout, organise ideas clearly, and personalise their work so it feels true to their experience. Remind them that their writing should explain what they discovered about habitat design, why certain choices were important, and how working with classmates changed their thinking.
When giving feedback, focus on thoughtful reflection, clear communication, and growing digital confidence. Help students see their résumé as a record of their journey as young environmental designers, showing how their understanding, teamwork, and problem-solving continue to develop each week.
This week, you will add your sixth experience to your digital résumé by reflecting on how you planned a better habitat for all the Champion Animals in your class. Think about what it felt like to study your map again, notice what was missing, and work with your group to design a habitat that could help every animal survive. You might reflect on choosing symbols, discussing ideas, or solving problems together as you created your design.
You could write about how it felt to compare your Wild Lists with your classmates, or how your thinking changed when you realised how many improvements your school habitat needs. You might also reflect on presenting your ideas, listening to others, or voting for the design that you believed was the most realistic and helpful.
Each reflection shows how much you are growing as a planner, a thinker, and a protector of the natural world. By adding your ideas to your digital résumé, you are showing how your creativity, teamwork, and problem-solving continue to develop as you move further into your Rewild Your World journey.


Share Your Thoughts on Dear World
Encourage students to see this Dear World story as a chance to communicate with real readers, not just complete a task. Help them understand that their words can teach, guide, and inspire others who care about wildlife and habitats. Remind them that writing for a purpose means thinking carefully about what message they want to share and why it matters.
Model how to turn observations and decisions from their habitat design into meaningful reflections. Show students how to describe their thinking clearly, explain the choices they made, and highlight the values they used, such as teamwork, problem-solving, and care for the environment.
Support students as they select photos or sketches to include with their stories so that their published work feels authentic and engaging. Celebrate writing that shows personal insight, curiosity, and a desire to make a difference.
Above all, encourage students to use their voice with confidence. Their Dear World entry is more than a story; it is a message of hope that invites others to understand local habitats and take positive action for the creatures that depend on them.
This week, you will write a Dear World story based on your habitat planning. Think about what it felt like to compare Wild Lists, study everyone’s needs, and design a habitat that could support all the Champion Animals in your class. You might write about a clever idea your group created, something you had never noticed before, or a moment when you felt like a real habitat designer.
Reflect on the values you used, such as creativity, problem-solving, and teamwork, and how they helped you make strong decisions for your habitat design.
When you are ready, log in to the Dear World Library and upload your story. You can add photos of your map or design to bring your ideas to life. Use your writing to inspire others to care for nature and create habitats where wildlife can thrive.

Week 6 Quiz and Certificate
Use this short quiz as a chance for students to pause and think about everything they have explored this week. Their learning has now shifted from observing habitats to designing them, so encourage students to reflect on how their ideas, teamwork, and planning skills have developed.
Remind students that the quiz is not a test but a tool for checking understanding. It helps them recognise what they know about creating a functioning habitat, the importance of the Wild List, and how different animals’ needs connect. Highlight that strong answers come from thinking carefully, not rushing.
Before beginning, model how to read each question slowly, look back at earlier tasks if needed, and build a clear, thoughtful response. Encourage students to notice how their confidence in planning, problem solving, and environmental thinking has grown.
After the quiz, present the Week 6 certificate as a celebration of progress. Explain that each certificate marks a new part of their journey as young conservationists and designers. Invite students to look at their collection so far and recognise the effort, creativity, and care that has brought them to this point.
At the end of this week, you will complete a short quiz to reflect on everything you have learned about planning and designing a habitat that can support many different animals. The quiz will help you think about the work you have done, from creating your Wild List to designing a shared habitat that meets everyone’s needs.
Once you have finished the quiz, you will receive your certificate for this week. This certificate celebrates your growing understanding of how good planning, clever design, and thoughtful teamwork can help create a space where wildlife can thrive.
There are ten certificates to collect across the whole Rewild Your World journey. By the end of the course, your complete set will show your growth in creativity, problem solving, and care for the natural world we all share.
